
Sewing this simple, compact style bandana bib is great to have on hand once your toddler gets older and more active.
Of the bibs that we have in our house, there are two kinds: one is the one with the big front that wraps around the back in a loop. The other, which I’ve used more as my daughter has gotten older, is a bandana style. For a bigger toddler, this is easier than the big panel style bib since it’s less intrusive and she can be more active with it. So this week I wanted to make some more of these, both for me and a friend of mine who is expecting.
This is a follow up to my other bib sewing project that was the bigger panel style bib. I wanted to simplify my other pattern and remove a lot of the steps like sewing the binding on. This one is a simple two layer design with some interfacing to reinforce the snaps. Originally I also wanted to make this one more angular so that it’s easier to pivot around while sewing. But honestly it wasn’t as visually appealing as the rounded kind. I’ve found that sewing rounded corners, while visually appealing, can be more of a hassle when sewing at a faster speed. That being said, it’s best to take it slow at this part when going around the sides.
Some Key Pieces of Sewing the Bandana Bib
I am using metal snaps this time around rather than Velcro. So the important thing when sewing is to add interfacing around where the snaps will go into the fabric. This is so that the fabric around the snaps doesn’t fray after constant use. I am using a midweight interfacing, specifically Pellon SF101 Shape Flex interfacing.
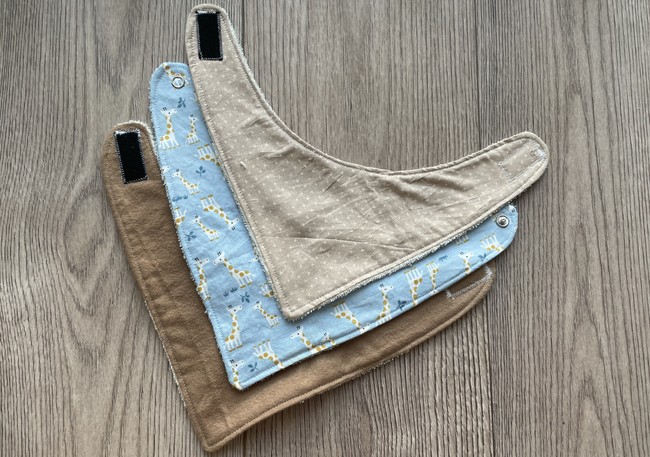
I am also doing two variants for this one, but the process is the same for both. One is flannel on both sides. The other is flannel on one side with terry cloth on the other. I am going with cotton fabrics for this since they’re softer. For sewing the bandana bib in this tutorial, I am doing one side flannel and one side terry cloth.
Materials to Sew the Bandana Bib
- 1/8 yard cotton fabric or flannel.
- 1/8 yard of terry cloth if doing a towel side.
- 2 7/18” metal snaps and associated snap pliers/application tools
- Interfacing to reinforce the snaps ((see above, Pellon SF101)). Alternatively you can use extra cotton fabric. The idea here is to reinforce the snaps so they don’t fray at the edges or tear out.
A Note About Adding Snaps
If you are doing any kind of kid related clothing or accessories I highly recommend investing in a pair of snap pliers. Velcro/hook and loop tape is also an option, but with things for toddlers, once they have the dexterity to pull it apart they will.
Snaps make it easier to keep stuff together. Snaps are also handy if you are into making bags. I used to use larger snaps, then looked at the bibs we were buying and saw that they were using 7/12” snaps and decided to go with these.
But it can take some getting used to (and a lot of broken snaps) to get the hang of attaching the snaps. So if you are still learning and want this to be less of a snap practice project, then I recommend going with the easier route of hook and loop tape.
How to Make the Bandana Bib
Start by printing and cutting out the free sewing pattern here.
You will need one body piece A and one bottom body piece B.


Also mark and cut out the interfacing pieces. You’ll see that the terry cloth I’m using is the same fabric as from my toddler bath towel tutorial. And the cotton fabric is the same fabric I used in my handkerchief tutorial.

Mark the spots for the snaps on the top fabric matching the dots from the pattern. I like to use pins for this. Line up the pattern with the fabric, push the pins through and mark on the other side.


- Iron the interfacing to your top piece following the manufacturer’s instructions.


Next, line up the pieces of the bandana bib pattern with right sides facing (RSF). Pin/clip these layers together.


- With right sides facing (RSF), stitch the top piece to the bottom piece with a 1/4” seam allowance.

- Be sure to leave about a 2” gap at the end to use for turning the bib right side out.

- Trim the seams and turn the bib out. Use something like a chopstick or paint brush handle to poke out the corners and edges of the fabric. Mind the interfacing when you’re poking it out so you don’t peal it off.


A Note About Fabric Turning Tools
Once I started sewing, one of the things that would often bug me is poking out the corners of fabric once I’ve turned it right side out. I’m a stickler, so I always try to poke it out into as clean a corner as possible. There are professional tools like point turners that you can use to poke out corners and flatten edges for turning. These look like a small, pointy butter knife.

But one tricky thing about these is if you push too hard into the corner, depending on the fabric like cotton, it’s easy to accidentally poke a hole. So it may sound funny, but what I’ve found, and many people have found as well, is that one of your most reliable sewing tools for this work is a wooden chopstick. The chopstick is long and sturdy, and just rounded (but not too pointy) to help make short work of turning fabric. I even bought a pack of stuffing once that came with a “special tool” that was basically a disposable wooden chopstick. So the next time you’re getting take-out, grab an extra pair of chopsticks and keep it in your sewing inventory forever. You won’t be let down.
Finishing Up the Bib Body
Following that, tuck in the edges from your 2” opening you left and iron down the sewn bandana bib pattern nice and flat.


After that, starting with the opening, sew a top stitch all around the edges with a 1/8” seam allowance, closing up the opening in the process.


Prepare the Snaps
In the final steps for sewing the bandana bib you will prepare the snaps. With the interfacing in place, the process of putting the snaps in is pretty straightforward.
Start by using the same method of using a pin to mark where the pins go using the previously described method.

Follow the directions here to snap them in place.

I find that it helps to line up the snaps on the fabric first then line up the pliers on these. Otherwise it can be hard to try and fasten the snap pieces into the sockets securely then fastening.

Important note: Make sure you are matching up the correct ends of the snaps and putting the correct side of the snap on the correct side of the fabric. The worst thing is to use all your strength to squeeze the snaps on only to realize they are not lined up correctly. Double and triple check here before sealing them on.

The male end of the snap will go on the top/right side of the cotton side of the bandana bib. The female end of the other snap will go on the terry cloth side.

If you want you can try and stitch a circle around the snap edges. This will keep the edges of the fabric that are next to the hole from getting tugged on and hopefully increase longevity of the bandana bib. This can be tricky, though, since the snaps are so small.
The easiest method, though, is to use hook and loop tape (velcro) as a fastener. This is easier to sew down and you don’t have to fight with the pliers if the snaps keep coming out (which happens to me often) and you waste a set of snaps.

And that’s basically it. The process of making the bandana bib is a lot more straightforward and simple than the other bib. But it also doesn’t have as much surface area as the behind-the-neck bib, so is probably more suitable for bigger and more mobile kids.

Leave a Reply