
This will save you time and money not needing to buy and change out potty pads in case of accidents.
Why a Washable Potty Training Car Seat Liner?
One of the stressful things I’ve found about potty training is keeping your car seat dry. With a toddler, we try to maintain a rhythm of going potty before we leave and going when we get somewhere.
But in the hustle and bustle of daily life it’s easy to forget. And for me with a toddler it’s a blessing to even be able to get out the door. So there is always the risk that we forget and there’s an accident. The redundancy then is using something like a puppy pad on the car seat. This has worked well. The tricky part with this is that it will often get messy with snack crumbs, bunch up and there’s the environmental issue of throwing it away if it does get used. And if it does get used, we take it out to clean or change then forget to put a new one in.
And it’s always that one time you forget that it happens.
Have you ever had to take a cover off a car seat to wash it? It is a major hassle. It’s something that you want to avoid doing a lot. Our solution for avoiding soiling the car seat is to use the above noted puppy pads. But one: using puppy pads, while easy to fit into the car seat, get bunched up and can be very bulky and unsightly. And two: somehow more crumbs get accumulated in the car seat with the puppy pad in the car seat than if there were no pad at all. Three: it costs money to buy and change them.
What to do to protect the car seat from accidents?
So my solution here is to design and sew my own washable car seat potty training mat. This involved mapping out the curves of the car seat and making a fabric mat that would fit in it.
There was a great tutorial I found before my daughter was born for sewing a burp cloth with a plastic shield in between to prevent leak-through. So I decided to add this shield in the middle of mine.
The gotcha with measuring out the shape of the car seat potty mat were the sections for the shoulder straps and the “crotch strap” as the car seat manual calls it. So I designed the mat to fit around this.
It took a couple iterations to get the fit. But I think I got a good universal fit. We have two car seats from different brands so I needed it to fit both. Our car seats are the adjustable kind that you can change as your kid gets bigger.
Materials to Sew the Washable Car Seat Liner
- 1/2 yard flannel fabric (it’s thicker and more absorbent than regular cotton)
- 1/2 yard of shield material (I am using Shield by Fairfield)
- Scissors, thread, machine, etc

Putting it All Together
The process of sewing the car seat potty pad is pretty simple. It’s like sewing the baby blanket shown in this tutorial. You will be sewing the three layers together, turning right side out and top stitching.
Start by printing and cutting out the free sewing pattern here.
If you are unsure of the fit of the pattern, I would recommend testing the paper pattern out in your car seat before cutting out any fabric. If it is too big or too small adjust accordingly.
See if it fits and make any manual adjustments to the pattern before you sew the actual car seat pad. If you want to be double sure you can use muslin or scrap fabric and sew a test version and make adjustments as necessary before you fully commit.
Trace and cut out two of the pattern pieces on the flannel. If you are using a patterned fabric be sure to flip the pattern over for one side so that they line up.


Mark and clip out one piece of the shield fabric.

Stacking the Layers
Stack and pin/clip the layers together in this order: Flannel panel 1 right side up, flannel panel 2 right side down, shield fabric on top (the order will be reversed once you turn it, meaning the shield liner will be inside).


Next, starting at the top, sew around the edges with a 1/4” seam allowance.

Note: Sew with the soft side of the shield liner up. This way it won’t get stuck and gummed up on the presser foot.

Take it slow around the seat belt gap so your layers don’t get tangled or spill off the machine. Sew an additional reinforcing stitch around the seat belt corner areas as well to strengthen the stitch. These areas will be a lot of traction with kicking feet.

Leave about a 2” gap at the end to turn. Don’t forget to back stitch at the beginning and end.


Trim the seams and turn the car seat mat right side out through the hole you left.


A note about fabric turning tools:
Once I started sewing, one of the things that would often bug me is poking out the corners of fabric once I’ve turned it right side out. I’m a stickler, so I always try to poke it out into as clean a corner as possible. There are professional tools like point turners that you can use to poke out corners and flatten edges for turning. These look like a small, pointy butter knife.
But one tricky thing about these is if you push too hard into the corner, depending on the fabric like cotton, it’s easy to accidentally poke a hole. So it may sound funny, but what I’ve found, and many people have found as well, is that one of your most reliable sewing tools for this work is a wooden chopstick. The chopstick is long and sturdy, and just rounded (but not too pointy) to help make short work of turning fabric. I even bought a pack of stuffing once that came with a “special tool” that was basically a disposable wooden chopstick. So the next time you’re getting take-out, grab an extra pair of chopsticks and keep it in your sewing inventory forever. You won’t be let down.
Iron down flat. Be sure to iron down the edges of the gap that you left. These will need to be tucked in and nice and flat in the next step as you top stitch the car seat liner.


Adding the Finishing Touches to the Car Seat Liner
Fold in the edges at the hole and sew a top stitch all the way around with a 1/8” seam allowance. Sew up your turning hole in the process.
A hack that I use when keeping track of my seam allowance is to track a spot on the sewing foot that aligns with the actual seam allowance. This can be easier than trying to track it with the ruler on the base or a seam gauge. You can see in the below picture that the 1/8″ seam allowance line matches up with the middle point of the right side of my sewing foot. So I try to line up the fabric to this middle point when top stitching.


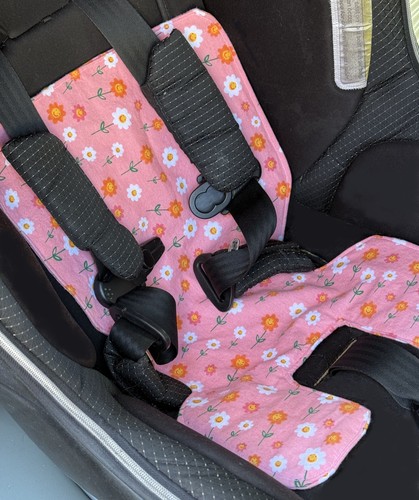
Iron this down nice and flat and you are all done. Check it out.

Try out in your car seat. Hopefully this saves you money on disposable puppy pads and saves you some time cleaning out the car seat. This also works as a stroller potty pad as well.

Leave a Reply