
In sewing this DIY car organizer you’ll see that the beauty of knowing how to sew is that you can create your own designs for organizers that solve storage needs specific to you.
The Backstory
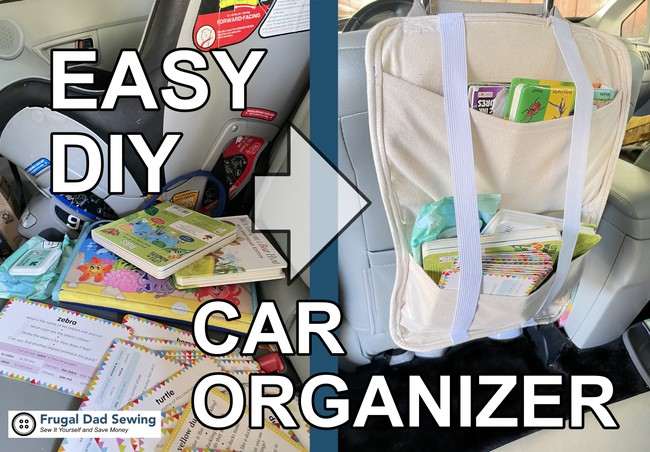
My wife and I have always strived to maintain a low screen time environment in the car with our our kids. The one exception being really long road trips, and we use a portable DVD player as the nuclear option. That being said, maintaining low screen time in the car with our kids requires a lot of books and activities in the car that my daughter can play with in the car seat. And as things go with stuff in the car, entropy is the name of the game. Stuff ends up in the car but never gets taken out. So things start to pile up, next to the car seat, behind the car seat and in front of the car seat. And this gets messy. And I try to for the books and stuff into the car seat pockets but these are really small. The option then is to get a car organizer for the back seat. But these cost money. So my plan to mitigate this is to sew my own organizer using my leftover fabric stash of cotton canvas and save some money.
Benefits of Sewing Custom Designs Like this DIY Organizer
By sewing a homemade car organizer myself I also have the luxury of customizing the design of the organizer to suit my individual needs and the predilections of my own child.
For this project I am using canvas fabric and a thick interfacing to make it more firm. To make it easier I’m also just going to sandwich the interfacing between two layers of canvas and sew it up with bias around the border.
I am doing two pockets here. The lower pocket I plan to overlap with the top opening of the car seat pocket so that I can tuck books into it and keep it from swinging around while driving.
With the two pockets you can also use this as a wall organizer if you don’t use it in your car.
The DIY Car Organizer Design
The organizer will consist of a main panel made up of three layers: 1) top layer of cotton canvas, 2) middle layer of stiff interfacing to give it structure and 3) bottom layer of cotton canvas. There will be two pockets. This will all be sealed around the edges by fabric bias.
On the top there will be a strap that you can loop around the head rest of the seat. To make it more secure when driving, so the books or other things in there don’t flop around, I am adding two velcro straps across the main body panel.
Your Assembled Pieces

- Main body: Cut out the two canvas panel pieces. I will refer to these after as the front panel piece and back panel piece. You will cut the panels in the following dimensions: 12” x 18”
- Middle layer of interfacing. The specific type of interfacing I am using for this project is Peltex 70 – Ultra Firm Sew In. The dimensions for this interfacing layer will be the same as the main body panels: 12” x 18”
- Two pockets. You will cut out 2 pieces for each pocket. The pocket panels will be cut into these dimensions: 14” x 8”.
- Bias perimeter: 65” x 2” (has slack that you can trim at the end)
- Buckle clip (Optional)
- Strapping with about a 10” length
- 1/2” wide elastic. You will need 36″ (18″ for each of the two straps that will go over the pockets)
Sewing the Car Seat Organizer
First sew the pockets that will be attached to the main panel. I am doing a rolled hem for each pocket so the raw edges don’t get frayed and I can move things easily in and out of the pocket.

Fold the top long side under about 1/4” inches and iron this down. Then fold in again 1/4” and iron. This is where you seam gauge comes in really handy.

Pin/clip these down and stitch along the folded edge. Now the finish is nice and clean and the raw edges aren’t exposed.

Repeat this process for the other pocket.

Prepare the Main Body of the Car Seat Organizer
On one of the main body panels, measure down about 2” from the top and mark a line. Mark another line at the bottom of the top pocket panel then measure down another one inch. Mark another line here. Then mark another line at the bottom of this panel. These will be your guides when pinning the pockets down.

Pin the pockets to the front body panel piece.

The width of the pockets is wider than the body of the organizer so that there is depth to the pockets. Fold the fabric in at the bottom of the pocket with a pleat. If you are using thick canvas, when you are sewing around the pleated corners you may need to manually turn the wheel and stitch so the needle doesn’t get stuck or break.


Sew the pocket panels down onto the main panel. Fold the raw edges in around the side and the bottom and stitch around the three sides to attach the pocket to the main body. You will see that the width of the pockets is longer than the main panel. This is so that the pockets have depth. Pinch and fold in a small pleat at the corners of the pockets and pin these down. The width of the pockets and main panel should be the same now.
Assembling the Layers of the Car Seat Organizer
Now you’re going to attach the layers together and sew on the bias. Layer the back panel, interface and front panel together.

If you are making your own bias (which I recommend), follow these steps to prepare it.
I recommend investing in a bias tape maker kit. This makes the process of preparing bias tape a lot easier and helps you save even more money than buying pre-made bias tape.
Preparing Your Bias
You will need to cut out a 2” strip that is in total 65” long (the total is 60”, but I added in some slack just in case). You can split this up into 2 33”pieces so it’s not too much of a hassle. So if you are cutting 33”x2” strips you will have 2 strips.

When sewing the pieces together, sew like you would sewing squares of a quilt (if that’s familiar). Place the two pieces on top of each other right sides facing (which won’t make a difference if you’re using blank canvas fabric like in this case), then sew the two sides together at the end with a 1/4” seam allowance.

Then for the next piece, stack the next piece on top of the end of the previous piece and sew them together. That’s what I did. For this one I’m using a fabric remnant that I got for cheap, so the length and width are limited. If you’re sewing with cotton fabric, don’t worry about the raw edges getting frayed. They will look clean once you make them into bias and sew them down.

Plug Number Two
I highly recommend investing in a self-healing mat, a quilting ruler and a rotary cutter. This makes cutting straight lines on fabric a million times easier than cutting with scissors. Just be sure to have a spot where you store the rotary cutter outside the reach of your kiddos. These things are like a pizza cutter with a razor blade in them.
Make the bias by starting out with your strip. Cut the head end at a 45 degree angle. This helps to line up the bias when you sew it so it’s not too lumpy.

Fold the strip in half lengthwise and iron down. Here you should have one long crease running the length of your strip.

Fold one long side in to this middle crease. Iron this down. Then do this for the other side. So now you have something resembling a reverse W shape with the raw edges inside the folds.


Benefits of a Bias Tape Maker
Now for the elephant in the room, this process is a huge pain in butt. So if you are serious about sewing (and not constantly burning your fingers), that is why I recommend investing in a bias tape maker kit. It blew my mind when I realized that a bias maker was a thing since I had already burned my fingers so many times.

You may not use it often, but like a pair of pliers it’s a good item to have in your sewing toolbox. Take this step slowly and methodically. Take a break midway if you need to to not burn yourself out. This can be a long process so this is one of those times where I treat sewing like a form of meditation.
Bringing It All Together
Once the bias is prepared you can start to assemble the car organizer. Sandwich the interfacing between the back panel and the front panel. Pin/clip all the layers together. This is the same method and makeup as the tummy time folio.

Clip and round the corners of the panel so it makes it easier to sew the bias around.

Sew a basting stitch around the edges to make it easier to attach the bias.

Pin/Clip the bias all around. As I always do with sewing bias, you can use the prim and proper method or the quick and dirty method. Both come with their own pluses and minuses. This one, because it is easier to use the prim and proper method with the rounded corners and it looks nicer I’m going to use that method for this project.
Below are the steps to sew the bias on using the prim and proper method
- Clip the bias all around with the raw edges of the bias aligned with the raw edge of the body panel.
- Sew this side down all around.
- Fold the other edge down and wrap around to the other side of the body panel and pull it nice and secure


Make sure you get the edges of the pockets tucked in under the bias.

Starting with your overlapped section sew around. Make sure the opposite side is also under the needle.

Prepare the Head Rest Strap
Once you’ve got the bias all down you’re going to work on the loop that goes around the car seat head rest.

I recommend measuring your car seat using a tape measure to make sure the length is correct.

If you are worried about the strap being too short, then it’s best to err on the side of caution and measure out more slack.

Mark out these positions on your homemade car organizer. The inside of your strap will align with the outside of your head rest pole. You will be using the same method as sewing the box stitch on the handles for the canvas tote bag here.

Fold the end of the strap under about 1” and align the end on that spot you marked earlier on the back of the car seat organizer. Place the end about 1” down from the top.

Stitch these down on the two sides using a box stitch.
You’ll see that the stitches on mine aren’t perfect. I tell myself not to let perfect be the enemy of good. And that’s the lesson we want to teach our kids if we are modeling sewing or any kind of learned hobby to them, right? You can use a thread that blends in better with the fabric to mask these inconsistencies.
In hindsight navy blue wasn’t the best contrasting thread color but that’s okay. I’m using it in this case so the stitches are more visible in the photos.
Attaching the Elastic
Since I am using this as my own car seat organizer I wanted to add some straps along the front to restrain the books and games, etc so they don’t fall out while driving.
Cut two 18” pieces of elastic. Fold the elastic in about 1” on each end and clip to the main panel 3” away from the long edges.

Stitch these onto the panel with the same X-type box stitch you did with the handle.

And that’s it. Try hanging it your car. Put some books and toys in it. Enjoy the added sense of organization that it brings rather than having a pile of books and stickers scattered around the floor mats.

It goes without saying to practice safety when driving with this in your car. If you are driving at high speeds like on a road trip then I recommend putting it in a lower location like at the base of the back of the armrest in the back seat.
Leave a Reply