
Build your sewing muscles by making an easy dino nugget plush.
Stuffed animals play a big role in a kids life I feel like. When I was a kid I had a lot of different stuffies. Some were gifts, some were souvenirs. And they carried a lot of weight to me emotionally. Nap time companion, travel companion, collection item. This list goes on. That’s why making your own stuffed animals for your kids is great. What better thing that you can make that your kids can cherish for a long time?
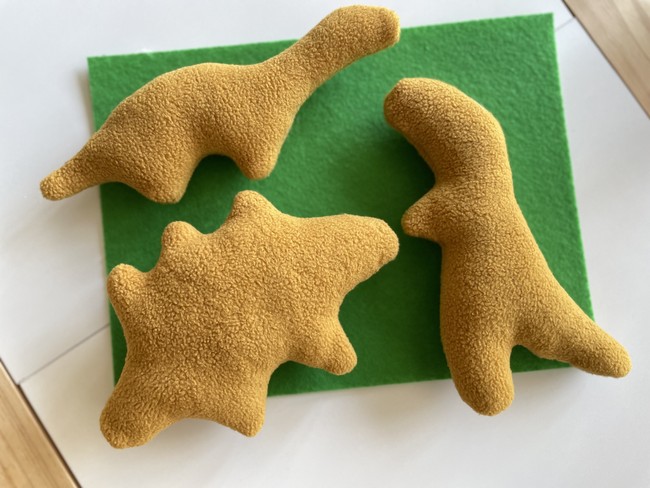
Enter the Dino Nugget Plush
What better stuffie to sew than another thing that your kids also cherish? A Dino nugget! This pattern is straightforward involving two sides that you sew together and stuff. You can get the premium, bigger pattern here. The bigger pattern has more features and a couple more steps to make. But is still fairly low entry.
Level to sew the stuffed animal: Confident beginner
Materials to Sew the Stuffed Animal
- Fleece fabric (the go-to for stuffed animals for me is either fleece or wool blend (a blend of wool and polyester). Fleece is more stretchy and has more give so can be easier to sew with if you’re worried about lining things up).
- Fiber fill stuffing (I go with Polyfill)
- Needle and thread
Anatomy of a Stuffed Animal
There are a few main parts and stitches to a stuffed animal.
Main pieces. Sides
Gusset: A gusset is a middle piece that goes between the two main sides to add depth to the stuffed animal. For, say, an alligator there are two sides of the body and the gusset is the belly in between.
Darts: darts are stitches you make that are slightly in from important joints of the stuffie. They help to add depth and stabilize the joints like for legs you would see a dart on the inside of the legs so that the legs don’t splay out.
Stuffing: There are a lot of varied types here. The standard is fiber fill, a polyester based fiber that you stuff inside the sewed up plush fabric. There are also weighted beads that you can use to keep it weighed down.
Safety eyes: These are plastic eyes that attach by snapping together one piece on the outside and the other on the inside of the fabric. Here is a good overview of safety eyes (I like this overview of sewing fabric eyes rather than plastic eyes): https://www.funkyfriendsfactory.com/blog/how-to-make-baby-safe-eyes-for-memory-bears-and-soft-toys/
Testing Things Out
It’s generally considered best practice if you are making a soft toy from a pattern for the first time, or designing your own pattern, to sew a test version using muslin fabric. Muslin can be purchased for very cheap so makes a good testing fabric that you can practice on and avoid wasting any more expensive fabric on a project that may go awry.
Steps to Sew the Stuffed Animal
- Cut out the provided pattern here.

- First, trace the pattern and cut out two sides. Make sure you trace one then flip over so the two sides are mirrored.


2. Once you’ve done that, pin or clip the two sides together right sides facing (RSF). With fleece you can tell which side is the “right side” by looking at the texture of the fabric. The “wrong side” will be more flight while the other side will be more fluffy. Put the two fluffy sides facing together.

3. Next, sew around with a 1/4” seam allowance. Back stitch at the corners to reinforce the edges.

A Note About Stitching
Stuffed toys get a lot of rough handling and there are many points for the stitches to get loose and the stuffing to get out. So keep your stitch length short when sewing up the two halves. About 2mm is a reasonable stitch length.
4. Remember to leave about a 2” gap at the end to turn right side out.

5. After that, turn the stuffed animal right side out. It helps to use a tool like a paintbrush or chopstick to help make it easier to turn. Fleece is very stretchy and forgiving as a fabric, so it does not rip as easily as if you were using cotton fabric.

A note about fabric turning tools
Once I started sewing, one of the things that would often bug me is poking out the corners of fabric once I’ve turned it right side out. I’m a stickler, so I always try to poke it out into as clean a corner as possible. There are professional tools like point turners that you can use to poke out corners and flatten edges for turning. These look like a small, pointy butter knife.
But one tricky thing about these is if you push too hard into the corner, depending on the fabric like cotton, it’s easy to accidentally poke a hole. So it may sound funny, but what I’ve found, and many people have found as well, is that one of your most reliable sewing tools for this work is a wooden chopstick. The chopstick is long and sturdy, and just rounded (but not too pointy) to help make short work of turning fabric. I even bought a pack of stuffing once that came with a “special tool” that was basically a disposable wooden chopstick. So the next time you’re getting take-out, grab an extra pair of chopsticks and keep it in your sewing inventory forever. You won’t be let down.
6. Next, stuff using fiber fill. the general rule of thumb with stuffing sewn stuffed animals is to stuff at a level that feels like you’re overstuffing. The filling will compress over time as it is used, slept on and stepped on. So lean on the side of overfilling with stuffed animals.

7. Finally, stitch up the opening using a ladder stitch.
Check here for steps on how to do a ladder stitch: https://mindymakes.com/how-to-sew-the-perfect-ladder-stitch-invisible-stitch-hidden-stitch-by-hand-a-beginners-guide/


If you’re interested in other projects using a ladder stitch, check out the kids fabric play dice project.
Wrapping it Up
And that’s it. These dino nugget plushies are a nice and simple entry into sewing stuffed animals. You can spin them up quickly and make them for your kids or even as Christmas presents, party favors or birthday presents for other kids.

Leave a Reply