
This mesh hanging kitchen organizer can help you make the most of a small space.
Reasons for Making a Kitchen Organizer
When you have young kids you end having a whole new set of cutlery, plates, lunch boxes and cups. And we have limited cabinet space. So being able to see and create additional storage that is tailor made to our house and environment has been great for us. Ive been coming up with designs for a functional organizer to use in our kitchen to store all of my kids lunch boxes, plates and cups. As I’ve said before in other posts like the minimalist closet organizer, when maximizing limited space, think vertically.
Enter the Hanging Kitchen Organizer
So I came up with the idea of a hanging wall organizer. And because it’s in the kitchen I decided to use a canvas body with mesh netting to hold everything.
Due to the high in and out of storing dishes in and out of the hanging kitchen organizer you have the option to use elastic at the top of the pockets. But be aware that you will need to use fold over elastic to get anything useful. I learned this the hard way. Regular elastic if folded over will just loop down like a horseshoe, making it difficult to get the pockets of the kitchen organizer to stretch straight across.
This is a measure and cut pattern with no printable templates so it’s ideal if you don’t have a printer at home.
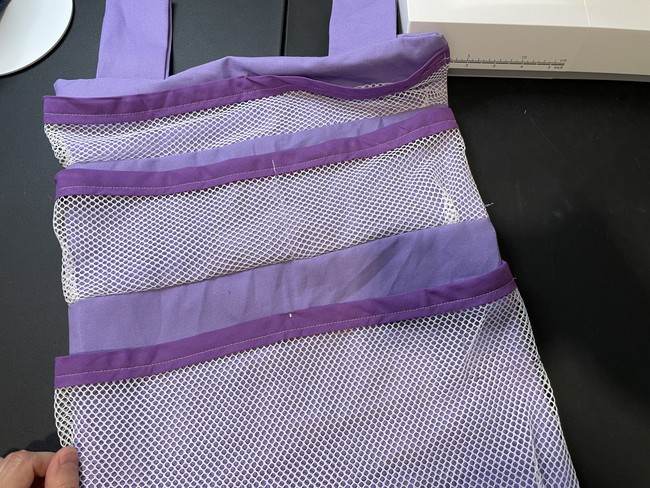
When I made this hanging kitchen organizer I ended up just using bias across the top because it was easier. And if it got dirty I could just throw it in the washer.
The Design of the Hanging Kitchen Organizer
The layout to make the hanging kitchen organizer is three different sized pockets on a main panel. I’ve taken a break from using bias around big body panels (which is different from my car organizer tutorial) so opted in this case to just do a front panel and a back panel with some looped top handles.
So the steps below break down the kitchen organizer build into these three stages.
Materials to Sew the Hanging Kitchen Organizer
- 3/4 yard of cotton canvas fabric
- 1/2 yard of mesh utility fabric
- 17.5” wide bias tape X 3 (51”)
How to Make the Hanging Kitchen Organizer
First measure and cut out your main pieces. You will cut out the below pieces:


Fabric Panels:
- Body panels: (1) bottom panel: 10.5” x 15.5,”, (1) middle panel: 5.5” x 15.5”, (1) top panel: 4.5” x 15.5”
- Back body panel (1): 19” x 15.5”
- Fabric Tab Pieces (2): 6” x 10”
Mesh Pockets:
Bottom (big) pocket (1): 9” X 17.5”
Middle pocket (1): 4.5” X 17.5”
Top (small) pocket (1): 3” X 17.5”

Seam Allowance: 1/2″ (unless otherwise specified)
You Can Make Your Own Adjustments
You can revise these measurements to what suits your space sizing needs. The general rule of thumb for sewing pockets is to make the pocket panels 2” wider and 1” longer than the corresponding body panel.

If you are modifying the panel sizes then keep these measurements in mind:
- 2” of vertical space between the pockets. This means if your final mesh pocket size is 5 inches, then the mesh pocket size will be 6 inches and the corresponding panel will be 7 inches.
- 2” of vertical space above the top pocket.
- Given the seam allowance of the fabric panels, the size of the back body panel will be the total length of all of the panels (before you sew) plus 1.5 inches to account for seam allowance.
Prepare the Pockets for the Hanging Kitchen Organizer
Cut and sew the bias to the top edge of the utility mesh using the prim and proper method detailed below:

Clip the bias all around with the raw edges of the bias aligned with the raw edge of the body panel. Then stitch in place using a straight stitch. The seam will be right next to your fold line like in the above photo.

After that, loop the fabric over to the other side and clip in place. You will have rounded edges on each side now.

Then secure this side down as well.

This will complete the cover of the mesh edge. Finally trim off the excess from the ends.
Sewing the Mesh Pockets Down
Next, on the left side of the pocket, line up the raw edges of the canvas and the mesh fabric.

Do the same on the right side of the pocket. You will see that the mesh pocket is now poking out some. So fold a pleat that is about 1” wide on both the left side and the right side so that the mesh lines up with each side. Clip it these folds down and sew a basting stitch around the three sides of the mesh pocket.

Repeat this process for the two other pockets: sew your bias to the top of the mesh panel, line up the mesh panels, pin your pleats and baste in place.

I recommend sewing a little tack stitch in the middle of the pocket so the pocket doesn’t flop out when you put stuff in it.


Your sewn pocket panels should look like this when you’re done.

Connect the Pocket Pieces of the Hanging Kitchen Organizer
Now, combine the three pockets into one main panel. First, place the top pocket pieces on top of the middle pocket piece with right sides facing.

The bottom of the top piece and the top of the middle piece should be aligned.

Sew these two pieces together with a zigzag stitch and 3/8” seam allowance.

Next do this with the bottom pocket and the middle pocket with right sides facing. The lower end of the middle pocket and the upper end of the bottom pocket should be aligned. Stitch the two sides together with a zigzag stitch and 3/8” seam allowance as well.


Prepare the Hanging Strap Loops
The process of making the strap loops is the same as the hanging closet organizer. Take one piece and fold it in half long ways.

Then sew one short and one long side. Leave one short side open to turn right side out.

Repeat this for the other tab handle.
Turn the two pieces right side out and iron down.


Putting the Hanging Kitchen Organizer Together
This is the final step. Fold the loop handles in half so they form a loop. Measure in 2″ from the edges and clip these in place.

Layer all the pieces together in this order: back panel, two loop handles (the raw edges of the tab handles will be aligned with the raw edge of the back panel. The loops will be facing downwards), pocket body right side down.

Clip these all in place. Then starting on the side, sew all the way around with a 1/4” seam allowance.

Leave about a 2” gap at the end to use for turning. Remember to back stitch at the beginning and the end.

When sewing the pocket panel to the back panel be sure to keep the pocket tops (the biased part) away from the stitch so it doesn’t get caught up in the fold.

Wrapping It Up
Reach in that hole and slowly turn the kitchen pocket organizer right side out. The bottom mesh pocket may get flipped to the other side of the pocket panel when you turn it.

The first time this happened to me I was confused for a good ten minutes since I couldn’t figure out how the mesh pocket got sewn onto the other side of the kitchen organizer. Then I realized that I just needed to pull it under and over to the other side.
At this point you can either use a slip stitch to sew up the side opening. Or you can just tuck in the ends to the hole and stitch it closed with your machine. I don’t need mine to look fancy so I just stitched it closed with the machine.
And that’s it. You can use a dowel to hang the mesh kitchen organizer. Use it in your kitchen or your bathroom. Our makeup in it. Or bath toys (but you may have to wash it more often if you’re doing bath toys).

Leave a Reply