
Being eco and saving potentially hundreds of disposable plastic can be as easy as a few stitches and leftover cotton fabric.
The Backstory to the Reusable Cotton Sandwich Bag
My wife and I try to be good stewards of the environment. We are also always trying to show our daughter good examples of being environmentally conscious. And reusable meal prep is always at the top of the list. Plus given recent articles about the amount of microplastics exposure in our lives these days and possible microplastics in our brains, I try to steer away from plastic containers when possible. So wrapping things up in cotton or other reusable materials appeals to me.
Fast forward to a few weeks ago my wife sent me a listing on Etsy for a reusable sandwich bag/cloth. The list price for one bag was $15. I thought “$15! There’s no way it would cost that much if you made it yourself.” So I set about designing my own sandwich bag to make for a fraction of that cost. I also get the added benefit of having more reusable bags around the house for lunches and picnics.
With Some Modifications
I like the idea of using the Velcro to secure the cloth. So I added some Velcro to the design. Otherwise it’s a simple process of sewing two layers of cloth and top stitching. And that’s it. A simple project that you can complete in a few minutes. Sewing the Velcro is probably the longest part.
Materials to Sew the Reusable Sandwich Bag
- 1/4 yard cotton, linen or muslin fabric. I am doing a liner of unbleached muslin with a cotton outer fabric.
- 12” of hook and loop tape (Velcro)
- Scissors and other sewing supplies
This is actually the same muslin cloth I used in the bento bag tutorial.
Steps to Sew the Reusable Sandwich Bag
Measure out your fabric and cut.

Measurements:
- (2) Squares 12” X 12” for the outer fabric and the lining
- (2) 3” strips of 3/4” Velcro
- (2) 1” strips of Velcro
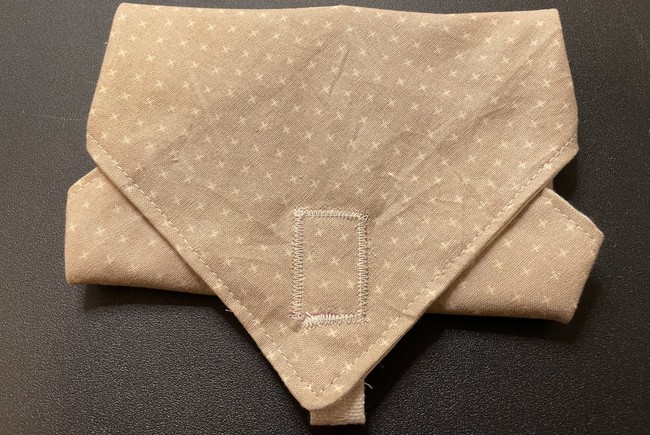
- (1) 3/4” wide strip of cotton or canvas that will be used for your folding tab. Fold in 1/4” on each side and stitch with a zigzag stitch to sewn down these folds.

There will be two pieces: one outside square and one liner square. You will have four strips of velcro: (2) long pieces and (2) short pieces.
Cut out your canvas tab.
Prepare the Sandwich Bag Body
Stack the two layers right side facing (RSF) and clip. Clip and round the corners if you want them more round. Or leave them pointy.

Sew the two sides together right side facing (RSF) with a 1/4” seam allowance.

Leave about a 2” gap at the end to use for turning your fabric right side out.

Next, turn the fabric right side out and iron everything down flat.

After that, be sure to tuck the edges of the gap you left open in and iron down. This will make it easier top stitch closed in the next step.

Finally, sew a top stitch all the way around with a 1/8” seam allowance.


Prepare the Tab
Take the tab and fold one long side down halfway to the center. Iron down.

Repeat with the other side.

Using a wide zigzag stitch, seal up the middle of the tab.


Sew the Velcro Flaps
Measure 1” down from each corner and mark. This is where you will sew the Velcro down.

The best way I’ve found to line up the Velcro pieces is to draw a line from one corner to the other. This will help you line up your Velcro strips on each end.

Following that, line up your Velcro pieces on the four corners of the linen sandwich bag.

You will be folding and sticking the corners together so put the long Velcro strips on the top side in the bottom two corners. Pin these down. Tuck the folded tab piece under one of the short velcro strips.

Next, position the short strips on the under side of the sandwich bag at the top corners. Pin these down as well.

Sewing Everything In Place
Finally you will sew the strips down to the fabric. Using a zig zag stitch, sew the Velcro strips to the sandwich bag fabric.


Remember to lock your stitch at the beginning and end. Once you’ve sewn the strips on all four sides down you’re done!

Now try out your new cotton sandwich bag. Put a sandwich in it. Or some candy. Or gold coins. Whatever works for you.
Leave a Reply