
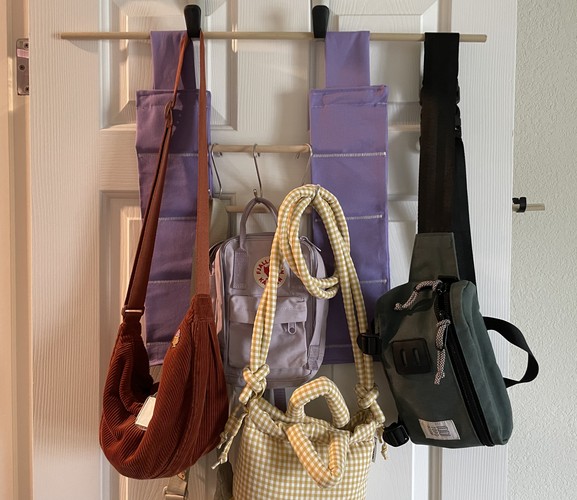
By sewing two simple panels and adding some dowels you can revolutionize your closet organization and declutter with this simple closet handbag organizer.
Background for Sewing this Closet Handbag Organizer
I’ve been on a recent organization kick. We live in a small space and I’ve been trying to come up with ways to optimize small spaces, declutter and designing things to sew to meet that goal. The golden rule for maximizing a small space for me has been “think vertically”. This is especially good in unused spaces like behind doors or corners. We have a metal book shelf near the kitchen that we hang stuff from using metal S hooks, which has proven to be very good for optimizing space. We hang a lot of bags from these hooks.
So if hooks on one bar is good for organizing then a bunch of hooks on a bunch of bars should be even better. So I decided to try and make a closet organizer with multiple rungs that can be used to hang handbags from the back of a door or wall. This is great way to organize them, keep them readily accessible, declutter as mentioned before. And it’s a great way to keep them on display instead of keeping them stuffed into a closet.
The Design for the Hanging Organizer
And the design for this hanging closet handbag organizer is super simple and straightforward. It is basically a long rectangle with multiple slots that can be used to hang wooden dowels in. Make two of these and feed the dowels in. Then use S hooks to hang stuff off it.
I am also adding in top loops to feed in a top dowel. These will be sewn onto the top.
So altogether you will have 4 pieces of fabric: two main body panels, two loop shapes.
Materials for Sewing the Closet Handbag Organizer
- 1/4 yard fabric for the two body pieces. I am using a 8 oz. cotton canvas for this.
- 1 long wooden dowel with a 7/8” to 1” diameter
- 4 smaller dowels with the same diameter
Sewing the Closet Hand Bag Organizer
Start by cutting out your fabric for the hanging hand bag organizer.

You will have six pieces in total. Cut two rectangles that are 6” wide and 10” tall. Next cut two other rectangles that are 8”wide and 18” tall. These will be the top handles and the main body pieces.

Step One: Sew the Body Pieces
Sew the Main Panels for the Closet Handbag Organizer
First prepare the larger pieces. Fold the shape in half along the short end. It will now be 5” wide.


Second, sew along the long, raw edge and one of the short ends. You will leave one end open/un-sewn for turning them right side out.


Turn right side out and iron down.

Repeat this process for the second main body piece.

Altogether you will have four big panels.
A note about fabric turning tools
Once I started sewing, one of the things that would often bug me is poking out the corners of fabric once I’ve turned it right side out. I’m a stickler, so I always try to poke it out into as clean a corner as possible. There are professional tools like point turners that you can use to poke out corners and flatten edges for turning. These look like a small, pointy butter knife.

But one tricky thing about these is if you push too hard into the corner, depending on the fabric like cotton, it’s easy to accidentally poke a hole. So it may sound funny, but what I’ve found, and many people have found as well, is that one of your most reliable sewing tools for this work is a wooden chopstick. The chopstick is long and sturdy, and just rounded (but not too pointy) to help make short work of turning fabric. I even bought a pack of stuffing once that came with a “special tool” that was basically a disposable wooden chopstick. So the next time you’re getting take-out, grab an extra pair of chopsticks and keep it in your sewing inventory forever. You won’t be let down.
Prepare the Handles for the Closet Handbag Organizer
After that, fold the smaller panel in half lengthwise with right sides facing (RSF). After folding it will be 4” wide and 10” tall.

Sew one short edge and the open long side (the side that’s not folded) together with a 1/4” seam allowance.
Now turn the fabric right side out just like you did for the main body pieces. You can sew a top stitch 1/8” from each long edge here if you want to make it prettier.
You’re almost there!
Step Three: Assemble the Panels and Pockets
Going back to the two main body pieces, fold in the remaining open edges. Iron the two out nice and flat and secure the folds inside them nice and crisp in the process.

Now you will have two big panels and one small top handle piece.

Take the two main body pieces and place them together. Fold the short piece in half, forming a loop. And sandwich it between the two pieces. It will be positioned at the top.


Pin this in place. Be sure to keep those folds from the opening inside.

Next, mark 1” down from the top of the main body piece and sew down, sewing down the handle in the process. This step can have a lot of lumps, so take it slow as can be a risk of breaking your needle depending on the weight of your fabric, so avoid stacking the seams together if possible.

Finally, sew a top stitch along the top at 1/4” from the edge, sewing the loop in place and sewing the two panels together.

Do the same thing at the bottom of the panels. You should have an assembled body piece that is a big loop. In the next steps you will sew into this loop to form the rungs for your dowels.
Sewing the Dowel Rungs for the Closet Handbag Organizer
Starting at the top, measure down 4” and mark with a line. Measure down another 4” and mark this with a line. Then do this again. You will have 3 lines 4” apart.


Stitch along these lines with a wide and short zigzag stitch. This is where your dowels will rest when they’re in the hanging organizer, so you want to make these short and strong enough to hold some weight.

The important thing for sewing these is reinforcing the areas where the dowels will hang. So make sure these lines on the hanging will organizer are nice and tightly stitched.

Repeat this for the other panel. It helps to line the second panel up with the first so that you can line up and mark the slots for the holder stitches on the second panel.

Once you’ve done the second set of stitches you’re all done!

If you are worried about the hooks scratching the door then I recommend sewing an additional panel behind the two panels. Another option is to wrap sleeves or tape around the part of the hooks that touch the wall.
This doesn’t have to be for just hand bags. That was the most readily available use in our house. You can use it for organizing anything on the back of the door that hangs: Jackets, jump ropes, plants, whatever. Anything you can imagine. This is a great solution to help declutter your home.

Leave a Reply